


 3Likes
Team Losi Racing 8ight 3.0


 02-15-2013, 07:28 AM
#168
Hello. have a 3.0 RTR version ?
02-15-2013, 08:04 AM
#169
02-15-2013, 08:18 AM
#170
02-15-2013, 11:29 AM
#171
Tech Adept
Looked at the 3.0 today in uk
Chassis looks good improvements look good.
More droop
Team drivers have their cars so hope we can get all water off track and see them running
Jim
Chassis looks good improvements look good.
More droop
Team drivers have their cars so hope we can get all water off track and see them running
Jim
 02-25-2013, 06:58 AM
#173
please share ur unboxing video, and how it run !
02-26-2013, 08:33 AM
#174
Tech Master
iTrader: (5)
Join Date: May 2005
Location: Having fun racing toy cars in beautiful AZ
Posts: 1,716
Trader Rating: 5 (100%+)
Stay tuned.............
02-27-2013, 11:23 AM
#175
I have a Tekno converted 8ight 2.0. So basically if I wanted to upgrade to the new 16mm 3.0 shocks, I'd have to swap f/r diff cases, f/r arms, and f/r shock towers? Would the rest of my 2.0 parts still work like my Lunsford turnbuckles and the LRC plates with inserts etc? I also have the 10deg inclined carrier setup which I believe I read will not work with th3 3.0 arms. is this correct as well?
Last edited by QuikWgn; 02-27-2013 at 11:46 AM.
02-27-2013, 03:37 PM
#176
Tech Regular
I have a Tekno converted 8ight 2.0. So basically if I wanted to upgrade to the new 16mm 3.0 shocks, I'd have to swap f/r diff cases, f/r arms, and f/r shock towers? Would the rest of my 2.0 parts still work like my Lunsford turnbuckles and the LRC plates with inserts etc? I also have the 10deg inclined carrier setup which I believe I read will not work with th3 3.0 arms. is this correct as well?
02-27-2013, 03:47 PM
#177
You would not need the rear diff housing and you sure would want to upgrade to the new caster blocks along with the new spindles. I believe the bushings for the front arms and caster blocks are a little different. the LRC plates will be the same and the turnbuckles will work.
02-27-2013, 03:50 PM
#178
Tech Regular
i was told that they will be out as soon as the car is released.
02-28-2013, 01:27 PM
#179
Tech Master
iTrader: (5)
Join Date: May 2005
Location: Having fun racing toy cars in beautiful AZ
Posts: 1,716
Trader Rating: 5 (100%+)
Hello TLR fans. I will be posting my pro build up of the 3.0 and will be focusing on the tips that I have come up with over the years as well as keying in on the cool hop up parts that come standard with the TLR 3.0
Some of the more self explanitory build stuff will be breezed over but this should help you guys with a bullet proof 3.0 nitro buggy build up.
Hope you enjoy
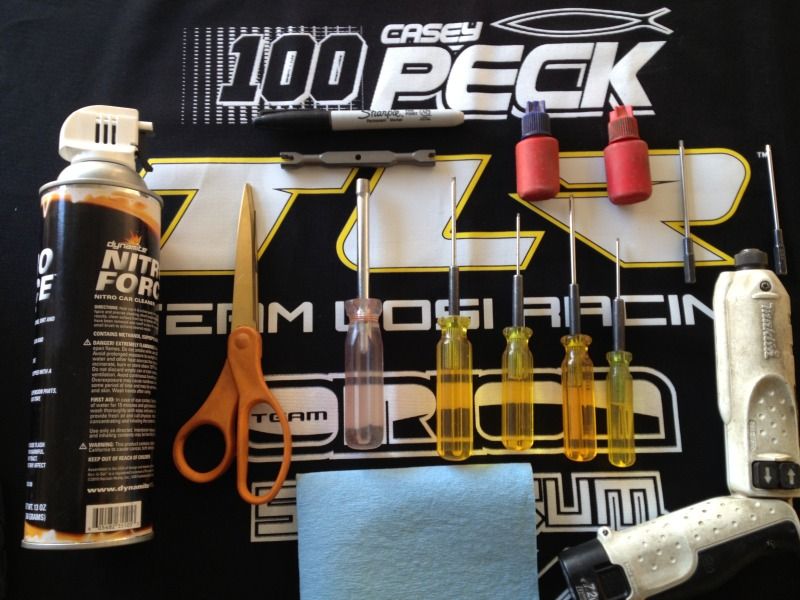
I will start with a clean work surface and some of my favorite hand tools
1. 3/32 ball end
2. 5/64 allen driver
3. 1/16 allen driver
4. .050 allen driver
5. 3/32 and 5/64 speed tip for drill
6. Small battery drill
7. 1/4" nut driver
8. 3/16" nut driver (not shown)
9. Exacto knife (not shown)
10. TLR camber wrench
11. Black Sharpie
12. Red and Blue loctite
13. Blue rags
14. Some kind of nitro spray / motor spray
15. Digital callipers
16. Smooth jaw needle nose (not pictured)
17. And finnaly some sharp scissors. I prefer to cut kit bags open instead of ripping and pulling. This way no small parts get lost or missed
Some of the more self explanitory build stuff will be breezed over but this should help you guys with a bullet proof 3.0 nitro buggy build up.
Hope you enjoy
I will start with a clean work surface and some of my favorite hand tools
1. 3/32 ball end
2. 5/64 allen driver
3. 1/16 allen driver
4. .050 allen driver
5. 3/32 and 5/64 speed tip for drill
6. Small battery drill
7. 1/4" nut driver
8. 3/16" nut driver (not shown)
9. Exacto knife (not shown)
10. TLR camber wrench
11. Black Sharpie
12. Red and Blue loctite
13. Blue rags
14. Some kind of nitro spray / motor spray
15. Digital callipers
16. Smooth jaw needle nose (not pictured)
17. And finnaly some sharp scissors. I prefer to cut kit bags open instead of ripping and pulling. This way no small parts get lost or missed
Last edited by CaseyP; 02-28-2013 at 02:33 PM.
02-28-2013, 01:35 PM
#180
Tech Master
iTrader: (5)
Join Date: May 2005
Location: Having fun racing toy cars in beautiful AZ
Posts: 1,716
Trader Rating: 5 (100%+)
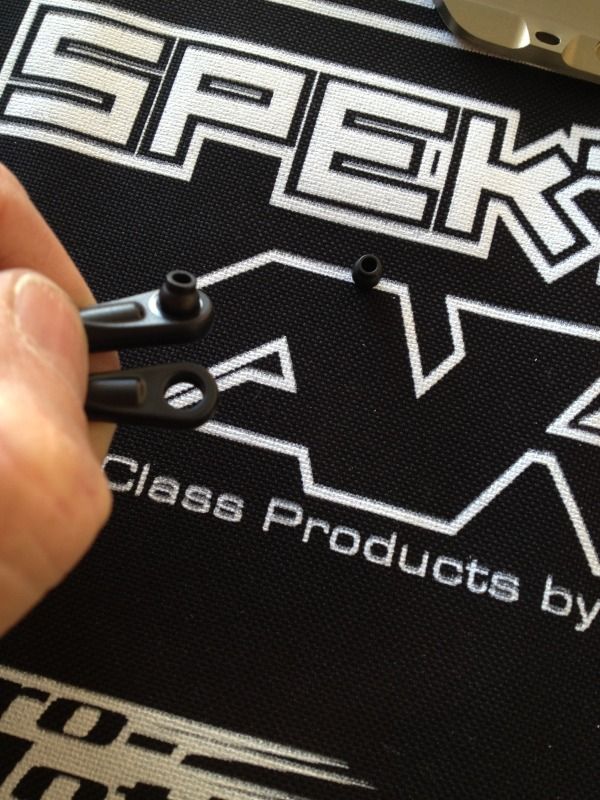
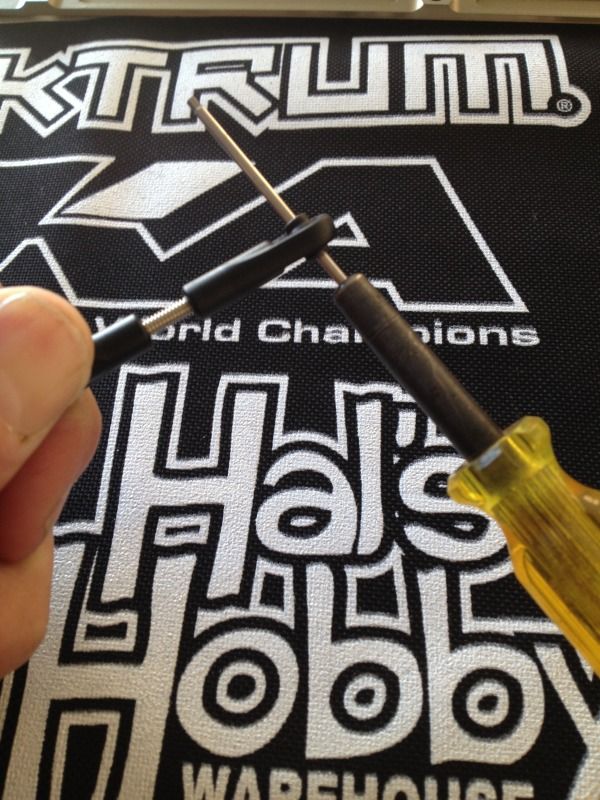
First up is the steering link build up. Notice the shiney side of the rod end on the top one. (The lower one is displaying the matte finish and is the wrong side to pop from) This is the side you will want to pop the ball into. it will yeild the best / smoothest swivel action.
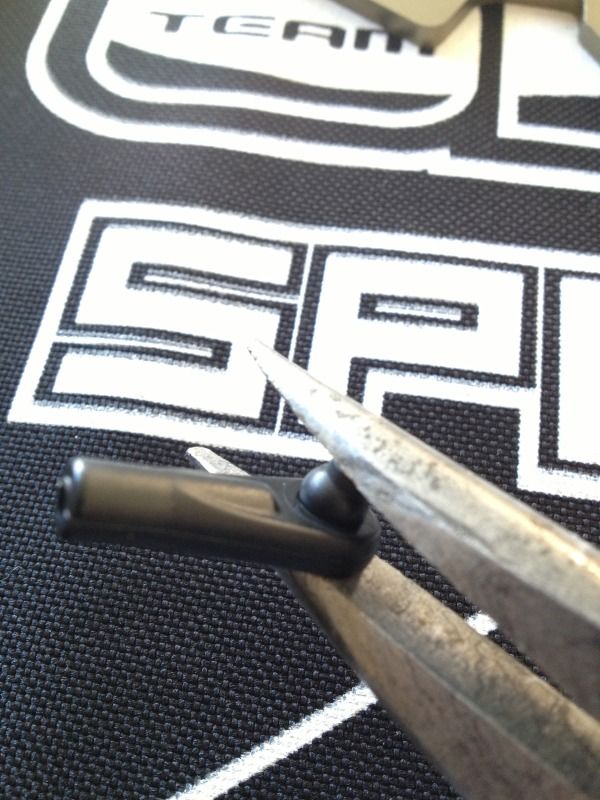
I use a a flat tooth set of needle nose to pop all of the ball in to the rod ends. This flat jaw style will not marr the aluminum or steel ball. Do this to both rod ends
Now with your 5/64 allen screw the threaded link into the rod end until it just starts to bottom out.
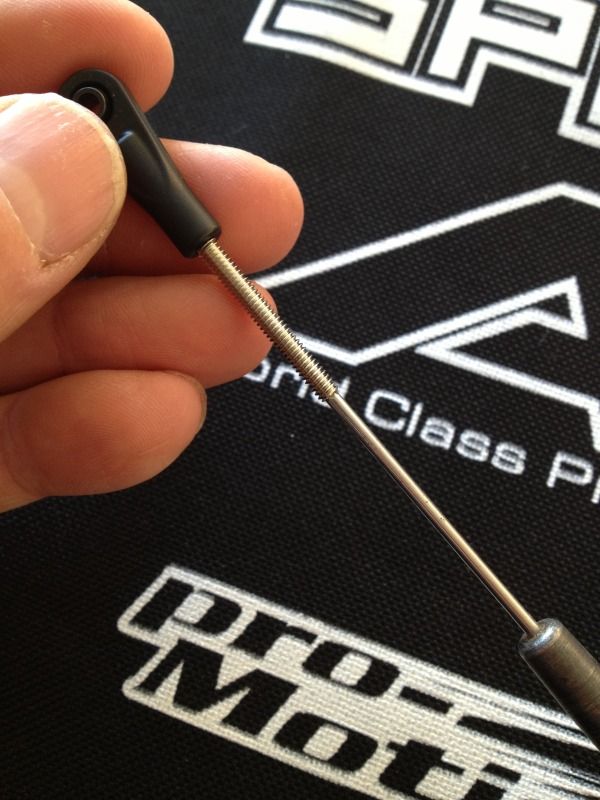
For the other side I will start the end in by hand and then insert the 5/64 allen into the ball to thread the rod on the rest of the way. (extreme force on the end with your fingers will eventually wear you out so I like to do things the easiet way )
I use a a flat tooth set of needle nose to pop all of the ball in to the rod ends. This flat jaw style will not marr the aluminum or steel ball. Do this to both rod ends
Now with your 5/64 allen screw the threaded link into the rod end until it just starts to bottom out.
For the other side I will start the end in by hand and then insert the 5/64 allen into the ball to thread the rod on the rest of the way. (extreme force on the end with your fingers will eventually wear you out so I like to do things the easiet way
)